Friday, August 12, 2016

Arrow Quilt - Green, Orange, and Gray Arrows


I've been working slow but steady these last few days and have completed my last sets of arrows! They seem to go faster and faster each time a make a new set.  The gray ones especially since there are only 4 of those!


I'm excited to start piecing the top together soon. Then I have to decide if I'm going to quilt it at home or rent time on a long-arm machine...

Saturday, August 6, 2016

Arrow Quilt - Red Arrows

I made a little progress on my Arrow Quilt today. I completed all of the red arrows. I didn't make any modifications to the provided colors for these arrows. It went quicker today than yesterday!


Bucket Bag Challenge

Last week while on my Honeymoon I saw an Instagram post about this Bucket Bag Challenge. I was intrigued by the bag and saved the tutorial as something I wanted to sew someday. I didn't think I would participate in the challenge because I was gone and didn't have an idea for what I wanted it to look like. BUT last night I had a dream about putting on arrow on the front of it, similar to what I made yesterday for the Arrow Quilt I'm sewing. I had to modify the arrow pattern from the quilt a little bit to make it smaller and had to modify the directions from the bucket bag tutorial quite a bit to make it the right size with the arrow instead of what he put on the from. It wasn't too difficult to figure out though. I made the outside of the bag out of extra fabric from other projects. For the inside fabric, rope, and grommets I had to make a run to JoAnns. Oh darn! ;-) I decided on this amazing bright lime green canvas for the inside because I LOVE bright colors and black rope to not distract from the arrow design. I've sewn a few circle bottomed bags in the past, so once I had the pieces cut out, the bag went together pretty quickly.

Wish me luck on getting picked as a winner. The prizes look pretty amazing!


Friday, August 5, 2016

Starting my Arrow Quit - Blue Arrows

I started a kit that I got a few months ago; Elizabeth Hartman Pointy Pattern Quilt Kit. I'm making a few modifications to the colors. I wanted the green/yellow one to be more similar in colors; more about that section later. I also replaced the pink arrows with true orange that I will place opposite the red arrows in the finished quilt.

About a month ago, I cut up all the background pieces so that when I returned from my Honeymoon I could just start sewing. It took a few days to start though because I came home sick! Ugh!

Today I completed the 5 blue arrows.


Saturday, March 19, 2016

Geese in a Monkey Wrench - Challenge 6 of Project Quilting

Happy National Quilting Day!!


I have participated in most of the project quilting challenges from Persimon Dreams. This is my first year participating. It was a blast! I can wait for next year and new challenges.

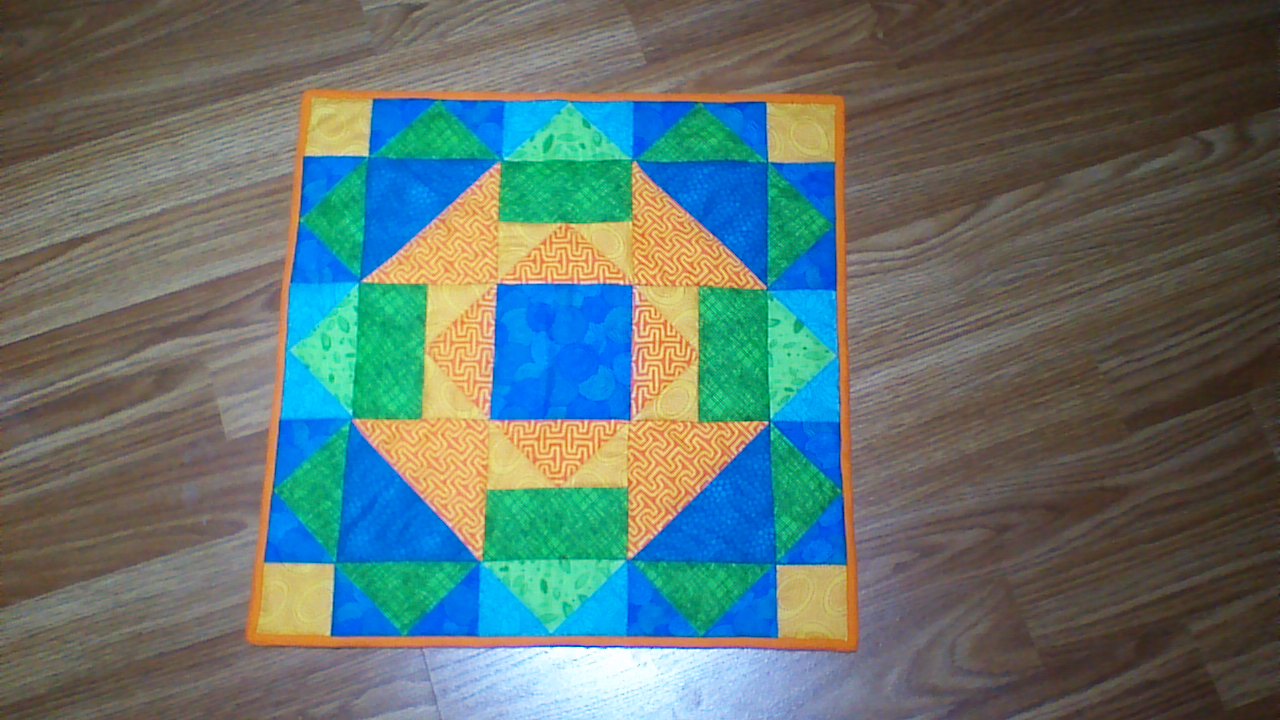
I started this challenge with the thought that I wanted to combine the monkey wrench and flying geese in a sneaky way. I started with just the center monkey wrench with the geese hidden in the center. Then I remembered seeing a picture captioned "how many flying geese?" and added the outer corners. Then I colored my drawing using my favorite colors (which I have a TON of fabric of).

I believe that your first solution to a problem isn't always the best, soil draw it again but colored it different.
 I also wanted to try doing a positive/negative block and flipped some of the outer geese. I thought that I was satisfied with the design, so started to figure out the sizes of pieces I needed to cut. I figured too different sizes; one with a 2" center and one with a 4" center.
 I left the drawings alone for half a day. When I looked at the drawings again, I decided with a little help, that I like how the border geese on the last drawing give a pointed frame and liked the colors from my first drawing. So, I drew it one more time.

Next, I picked out fabrics from my stash that matched the colors I planned in my drawing.
 I found an awesome tutorial on how to make flying geese 4 at a time! It was super easy that way, and perfect because I had 4 or 8 to make of each kind.
I have made lots of half square triangles before, and decided to use the 4 at a time method since I needed four.
 Here are all the sections - flying geese, half square triangles (for the monkey wrench), and solid pieces.
 I chain piece as much as possible. I feel like it makes everything go quickly and I like how it keeps the pieces in order. I wanted the fabrics to speak for themselves, so a stitched in the ditch to quilt it. I also like how then the front is ghosted on the back.
I really enjoy how it turned out! The finished piece is 16" x 16". I plan on using it as a table topper or possibly a wall hanging.


I create near Madison, WI.

Thursday, January 30, 2014

Zippers...

Quite awhile ago, I decided that I hate zippers. I don't WANT to hate zippers, but I just  never like the way they turn out.

I've tried this pretty normal way of putting in a zipper. I'm not sure if this is a *exact* tutorial that I used, but this is how I put the zipper in a few pouches.
I don't like how the ends are all squished looking... but I also don't really know how to fix it.


Next I tried a method that used tabs on the ends of the zippers before sewing it in. Again, kind of like this, but I'm sure this isn't the same tutorial I used.
Same problem on this one. There's even more bulk at the ends even though the pictures don't look like it.


Anyway, so I decided to sign up for a zipper pouch class at The Sewcial Lounge in Madison. I was super excited because the class was taught by Jeni B!


It was very small. Four students total. We started by ironing and cutting our fabric for 2 pouches... and it was just like first method I posted :-( Darn it, but I thought since I'm here I can pick Jeni's brain about zippers. So I told her how I don't like how the ends look. The secret? Straightening it as much as possible and then pounding it with a hammer... huh. I'll try that on one of the new pouches I made in class.
Ok, but I like the look of tabbed zippers better. The secret to that? DON'T SEW THROUGH THE TAB! Just get as close to it as possible without sewing it.

Now I need to make more bags...

Friday, January 3, 2014

I'm One Lucky Girl!

I got a new sewing machine for Christmas and didn't even (exactly) ask for it!

I had purchased some fabric on sale on Black Friday. I decided the perfect way to break my sewing machine in was a table runner (that's just a top piece right now) and a Nook cover (for my Nook that I got LAST Christmas...)

I sewed hexies for my Nook cover while away for Christmas and didn't want to haul my machine. After Christmas, I sewed it up just in time for our vacation!


It was a bit of elastic and a button to hold it closed. I found the button while cleaning my crafting things!!


At the same time, my dad made me an acrylic pattern to cut the shapes for my runner. I cut those out and threw this runner (top only right now) together in a night.

Nine of the ten fabrics...