Saturday, March 19, 2016

Geese in a Monkey Wrench - Challenge 6 of Project Quilting

Happy National Quilting Day!!
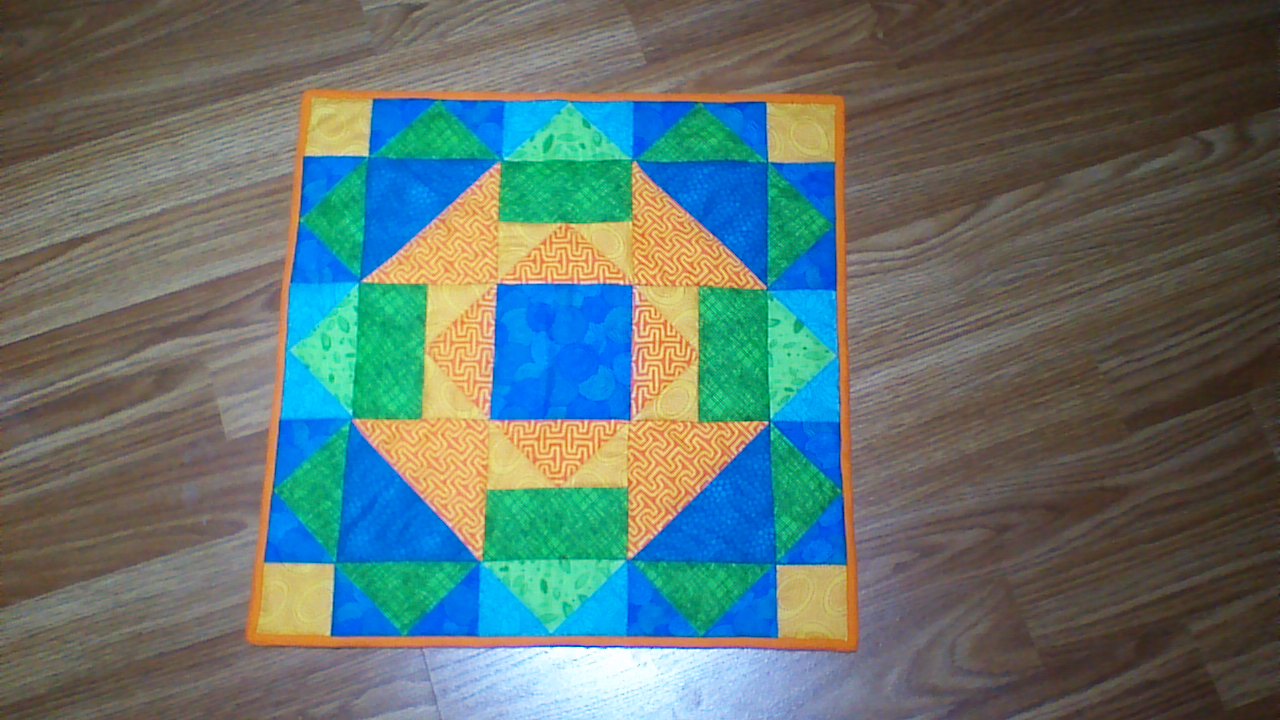

I have participated in most of the project quilting challenges from Persimon Dreams. This is my first year participating. It was a blast! I can wait for next year and new challenges.

I started this challenge with the thought that I wanted to combine the monkey wrench and flying geese in a sneaky way. I started with just the center monkey wrench with the geese hidden in the center. Then I remembered seeing a picture captioned "how many flying geese?" and added the outer corners. Then I colored my drawing using my favorite colors (which I have a TON of fabric of).

I believe that your first solution to a problem isn't always the best, soil draw it again but colored it different.
 I also wanted to try doing a positive/negative block and flipped some of the outer geese. I thought that I was satisfied with the design, so started to figure out the sizes of pieces I needed to cut. I figured too different sizes; one with a 2" center and one with a 4" center.
 I left the drawings alone for half a day. When I looked at the drawings again, I decided with a little help, that I like how the border geese on the last drawing give a pointed frame and liked the colors from my first drawing. So, I drew it one more time.

Next, I picked out fabrics from my stash that matched the colors I planned in my drawing.
 I found an awesome tutorial on how to make flying geese 4 at a time! It was super easy that way, and perfect because I had 4 or 8 to make of each kind.
I have made lots of half square triangles before, and decided to use the 4 at a time method since I needed four.
 Here are all the sections - flying geese, half square triangles (for the monkey wrench), and solid pieces.
 I chain piece as much as possible. I feel like it makes everything go quickly and I like how it keeps the pieces in order. I wanted the fabrics to speak for themselves, so a stitched in the ditch to quilt it. I also like how then the front is ghosted on the back.
I really enjoy how it turned out! The finished piece is 16" x 16". I plan on using it as a table topper or possibly a wall hanging.


I create near Madison, WI.

Thursday, January 30, 2014

Zippers...

Quite awhile ago, I decided that I hate zippers. I don't WANT to hate zippers, but I just  never like the way they turn out.

I've tried this pretty normal way of putting in a zipper. I'm not sure if this is a *exact* tutorial that I used, but this is how I put the zipper in a few pouches.
I don't like how the ends are all squished looking... but I also don't really know how to fix it.


Next I tried a method that used tabs on the ends of the zippers before sewing it in. Again, kind of like this, but I'm sure this isn't the same tutorial I used.
Same problem on this one. There's even more bulk at the ends even though the pictures don't look like it.


Anyway, so I decided to sign up for a zipper pouch class at The Sewcial Lounge in Madison. I was super excited because the class was taught by Jeni B!


It was very small. Four students total. We started by ironing and cutting our fabric for 2 pouches... and it was just like first method I posted :-( Darn it, but I thought since I'm here I can pick Jeni's brain about zippers. So I told her how I don't like how the ends look. The secret? Straightening it as much as possible and then pounding it with a hammer... huh. I'll try that on one of the new pouches I made in class.
Ok, but I like the look of tabbed zippers better. The secret to that? DON'T SEW THROUGH THE TAB! Just get as close to it as possible without sewing it.

Now I need to make more bags...

Friday, January 3, 2014

I'm One Lucky Girl!

I got a new sewing machine for Christmas and didn't even (exactly) ask for it!

I had purchased some fabric on sale on Black Friday. I decided the perfect way to break my sewing machine in was a table runner (that's just a top piece right now) and a Nook cover (for my Nook that I got LAST Christmas...)

I sewed hexies for my Nook cover while away for Christmas and didn't want to haul my machine. After Christmas, I sewed it up just in time for our vacation!


It was a bit of elastic and a button to hold it closed. I found the button while cleaning my crafting things!!


At the same time, my dad made me an acrylic pattern to cut the shapes for my runner. I cut those out and threw this runner (top only right now) together in a night.

Nine of the ten fabrics...

Wednesday, July 31, 2013

Finished Quilt!!

Hey! That quilt I blogged about last time... I finished it in July 2013!

Quilt top:

 Quilt top-batting-backing sandwich:

Here's the awesome end result...

I know there's a few things wrong with it, but I can't even remember what anymore... So I guess it doesn't really matter, huh?


Friday, June 28, 2013

Between Then and the Finished Quilt

Since my last post, I've completed a quick baby quilt for one of my boyfriend's cousins. I'm pretty proud of it! It took a few hours over 2 days and it made me feel better about finishing the larger leaf quilt.
April 2013


A side note, it was strangely hard to find pink baby fabric. I was pleasantly surprised since its not my favorite color, but also frustrating since that's what the mom wanted...


I've also completed my placemats that I started right after Christmas. I loved piecing the hexies and hand sewing... But it makes me wonder how to English paper piece with my machine.
Summer 2013


I am super proud of how I quilted it to mimic the hexies!

Thursday, December 27, 2012

Taking a Break From the Leaf Quilt

I'm taking a break from my leaf quilt, but don't worry it for a good reason.
1) It's the first Christmas living with my boyfriend! Therefore, we need stockings! But not just any old purchased stockings.... Pieced and quilted stockings of course...

    And a new Christmas tree skirt!


2) I start student teaching shortly after Christmas. I feel like I won't be doing art for personal fun, but instead practicing projects for making with students! Just as fun, but not sewing, lol.

Thursday, December 20, 2012

Leaf Quilt: Aug - Dec

So WAAAAY back in January I bought (what I thought to be) all the fabric I needed to make this leaf applique quilt. And then I cut MOST of the pieces: 8x8 squares and 2x2 squares and wonky strips.

In August, I actually started to put the pieces together... 8x8s cut into 2 and wonky strips sewn in between. Then cutting out the 120 leaves... Here's a photo of me (and Zoey) cutting the wonky squares back into 6x6 squares.


Then came the LONG (everything in this quilt feels like a long time) task of sewing all the 2x2 squares into 4 square strips (with Jody).


Then I decided that it would be a GREAT idea to hand stitch all the edges of the leaves... did I mention that this quilt is taking a long time? So that took me into November, when I realized that I was 20 leaf squares short and had to do all the steps over again for 20 more! But they look super nice all hand stitched and stuff...


Into December, I needed a fabric for the lime squares and decided that the quilt needs to be 6" larger on all sides SO had to order fabric. After very careful measuring, I bought the wrong amount (too little), couldn't buy more of the same pattern, and ordered some online... only to find that I still didn't order enough. New order and 1 yard too much, I'm set to keep going!! I cut the little squares for the inside and long strips for the outside and started to sew rows.

Cats are bad for this. They like to run across all my carefully laid out/planned pieces before I pick them up so that I have to do it all over again... they did this no less than 5 times... I just can't bear to lock them out!!

Then I sewed all the pieces together to make strips.


And devised this nifty, high tech way to make sure I sew them in order...


Now I'm sewing all the rows together. I'm 10 rows in with 19 more to go... the ironing is SO time consuming, I wish someone else would do that and I could just sew :-)

Here's the 10 rows...